So you've heard the buzz about kombucha, the trendy fermented tea drink touted to promote everything from better bowel movements to a great immune system. (Here's what happened when one writer drank it every day.)
You might have also noticed that it costs upwards of $4 a bottle. Yikes. Luckily it's possible to brew this beverage home, but before I get into the individual steps of kombucha making, there’s an important missive you must know: Don’t be scared of your SCOBY.
It stands for Symbiotic Cultures of Bacteria and Yeast. It grows. It multiplies. It floats. It sinks. It looks extraterrestrial. I was super intimidated the first time I saw a SCOBY, when a friend fished it out of her kombucha brew, slapped it on the cutting board, and carved it up. But this slightly gross disk of slime is also a wonderfully magical mass of bacteria and yeast that turns plain old tea and sugar into a fizzy, fermented sip of awesomeness loaded with antioxidants, B vitamins, and probiotics.
Armed with this new knowledge, you can forget your fear of making kombucha. What’s the worst that can happen? You botch your batch — SO WHAT?! Shake off your fears this year, and let the kombucha making begin!
1. Score a SCOBY.
As I mentioned, SCOBY stands for Symbiotic Cultures of Bacteria and Yeast. I got my first SCOBY from a friend, but as I’ve experimented with making kombucha, I’ve picked up a few more SCOBYs along the way, including one from a kombucha-loving fanatic I met at Trader Joe’s (thanks David!) and a “fresh kombucha culture” ordered online from Kombucha Kamp — and they've all worked like brew champs.
There’s no right or wrong way to secure a SCOBY, and don’t be fooled by appearances. "A beautiful versus ugly SCOBY doesn’t dictate health of brew," says Eric Childs, founder and CEO of Brooklyn Kombucha, who’s been growing SCOBYs for six years. "I’ve seen the ugliest SCOBYs brew the most delicious kombucha."
2. And some starter liquid.
Think of the starter liquid as your activator, the bacteria-packed potion that kick-starts your kombucha. "It’s the unspoken hero of the kombucha brew," says Childs. Ideally, get your starter liquid from the same place you get your SCOBY. You'll want at least 1 cup to make a gallon batch.
The other option is to use commercial brew (make sure it’s plain), although experts warn that the stuff you buy at the grocery store doesn’t have the diversity of bacterial strains for a full spectrum brew. I’ve used both and found that the homegrown starter liquid developed more flavor and fizz than the store-bought stuff.
3. Assemble your ingredients.
Good news: once you have the SCOBY and starter liquid, the rest is easy. All you need is tea, sugar, a 1-gallon glass container to brew it in, and breathable cotton cloth (not cheesecloth) to cover the top. That’s it. "If you have the right ingredients to start with, you’re going to be successful," says Hannah Crum, creator of Kombucha Kamp and author of The Big Book of Kombucha.
The tea should be unflavored and non-herbal, so avoid chai or ginger, which could contain flavors or oils that'll compromise your batch. Go for black, green, or white tea and plain white sugar or pure cane sugar. You can experiment with honey, maple syrup, turbinado, or combos of the sweet stuff once you get into the kombucha-making groove.
What'll You Need
Brews a 1-gallon batch of kombucha
- 8 tea bags (unflavored, non-herbal) or 2 tablespoons loose tea
- 1 cup pure cane sugar or white table sugar
- 1 SCOBY
- 1-2 cups starter liquid
- 1-gallon glass jar
- Tea towel (or breathable fabric) and rubber band
A quick note on that sugar: Yes, kombucha contains sugar, but not as much as you think. The sugar feeds the SCOBY and is converted to vitamins and antioxidants, so the finished brew will have far less.
4. Brew it, baby!
You’re ready. Your SCOBY is ready. The ingredients are ready. It’s time! Wash your hands and get this kombucha party started — here's how:
- Start by boiling 4 cups of water. Add the tea and steep 5 to 10 minutes. Remove tea bags and stir in the sugar until completely dissolved.
- Transfer tea liquid to your gallon container, fill almost to the top with water, and let cool until it reaches room temperature.
- Carefully place the SCOBY on top and then pour in the starter liquid.
- Cover container with a breathable cloth and secure with a rubber band.
5. Set up the right environment.
Now that your kombucha's mixed, your baby needs a home — a nice warm one far away from direct sunlight. "Temperature is huge," says Crum who recommends a sweet spot of 75-85 degrees Fahrenheit, the perfect breeding ground for the good bacteria. Too cold and the bacteria won’t thrive; too hot and your booch will turn acidic. I set my gallon jar in the cupboard over the fridge, and it was just the right temp.
6. Wait and taste.
I’m not the most patient person, which is probably why I found this step the toughest. This is when you just have to let bacteria and yeast do their thing. The SCOBY will grow and even multiply; the liquid will turn cloudy and maybe form bubbles around the top. Don’t be surprised if yeast strands start dangling like seaweed from your SCOBY.
It can take anywhere from seven to 20 days to ferment the tea — a wide gap, I know, which is why tasting is so important. "After about day five don’t be afraid to nudge the SCOBY aside and stick a straw in there," says Crum. "It tends to be a little sour up top and sweeter lower." When it hits the flavor you want — not too sweet, not too sour — it’s onto the next step.
7. Prep your next batch.
Before you bottle your newly brewed booch, there’s one itty bitty thing you need to do: Scoop out at least one cup of starter liquid and place it in a clean glass jar or bowl for your next bath ("Take it off the top where there’s more bacteria," suggests Childs) and remove your SCOBYs.
There should be two: the original ("mother") and the secondary SCOBY that formed on top ("baby"). You only need one SCOBY for your starter liquid — you can give the other to a kombucha friend in need, store it in a SCOBY Hotel, or compost it.
8. Bottle, flavor, and fizz time.
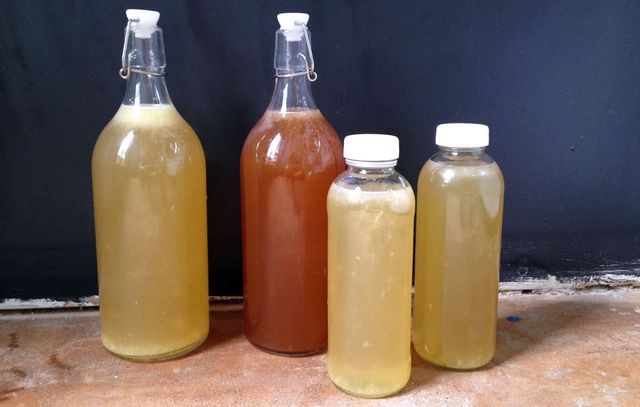
Congrats, it’s time to bottle! This is the fun part, where you get to play with flavor and fizz and customize your kombucha exactly the way you like it. Basically, any bottle with a secured cap works — I’ve used leftover store-bought kombucha bottles and the flip-top kind — just make sure they’re clean.
If you’re jazzing up your booch, add fresh fruit, fruit purees, herbs, or fruit syrups to the bottle. Two of my go-to flavors are tart cherry (add an ounce of tart cherry juice per 16-ounce bottle) and lemon ginger (add an ounce of fresh-squeezed lemon juice plus a pinch of grated ginger per 16-ounce bottle), but the combos are endless.
For flavor inspiration, The Big Book of Kombucha and Kombucha Revolution have recipes for every infusion under the sun, from root beer to rhubarb. I like my booch extra bubbly, like champagne, so I fill the bottles nearly to the top (about a ½ inch from the top), and then leave them at room temperature for two to four days to build carbonation before putting them in the fridge.
9. Sip and brag.
You’ve got your second batch already brewing and your first brew in bottles in the fridge ready to crack open. Time to celebrate with a swig of kombucha!
When I do open one up and hear a pop, I know I’ve got a keeper. Warning: You might get an "ooglies" on top — these are tiny baby SCOBYs that develops in the bottle (it’s alive!) — that you may want to fish out first. That’s kombucha for you, a growing, feeding, evolving miracle in a bottle. But hey, when you’re not intimidated by the SCOBY, one more is no big deal.
